A Herb Garden in the Sky

Reliance Compost

Nineteen floors up in the sky is an unlikely place to find a flourishing herb garden, but one actually does exist atop The Westin Cape Town. Granted, you’re not going to find rows of composted greenery lining the hotel’s roof, but what you will find is a rather unique vertical pocket garden that is blooming with all manner of herbs and edible flowers.Westin Cape Town Rooftop Garden

The hotel bases its operations on a ‘six pillars of wellness’ philosophy and the herb garden ties perfectly into ‘eat well’. The menu at On19 restaurant is rooted in natural, healthy cuisine that uses responsibly sourced ingredients.

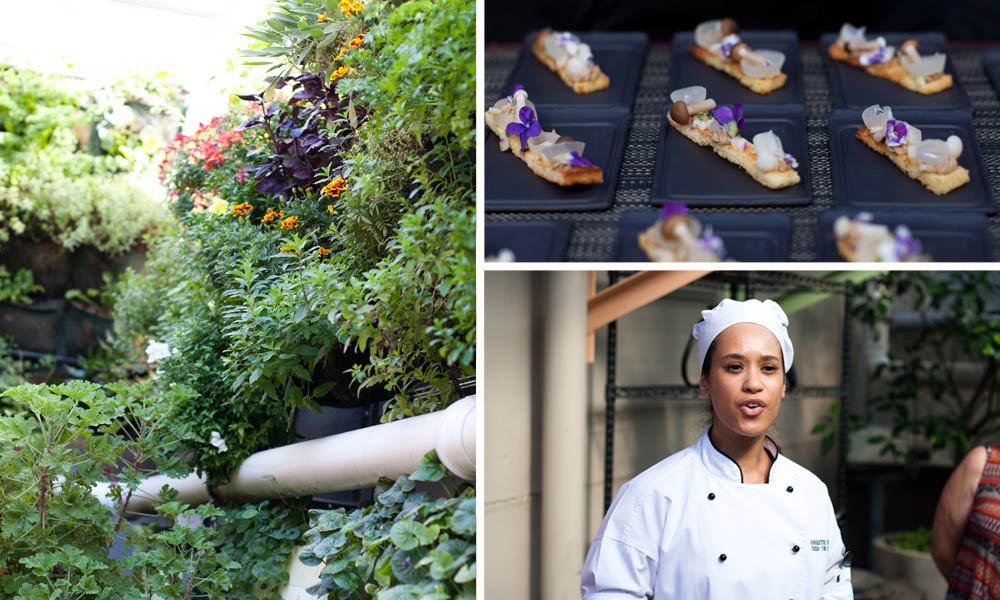
One hundred percent of the herbs and flowers that feature on the menu are sourced from the rooftop garden.

It can be easy for city chefs to become quite removed from where ingredients come from, especially in a hotel the size of The Westin, where most ingredients would be ordered in. The rooftop herb garden means that these city chefs get the opportunity to pick fresh, nutrient-dense herbs and small veggies from the garden, knowing that they have been grown with minimal intervention and have no carbon footprint. As Executive Chef Grant Cullingworth told us, this keeps these young chefs in touch with where their produce comes from and makes their use of these ingredients more mindful.
Westin Cape Town Rooftop GardenWestin Cape Town Rooftop Garden
The garden was designed, and is managed, by Herbologist Marcelle Warner of Vertical Veg, who also sells the cleverly designed vertical garden pocket panels. The pockets are hung from the walls and then planted with soil as with a regular garden. They are watered by means of a drip system – plants that require little water go at the top of the wall and those that require more are lower down. The water drips into the top pockets, those plants use what they need and the excess drips down into the next plants and so on. Any excess water is then pumped back to be recycled and used again. The garden even features a small-scale wormery – kitchen waste is fed to the worms and their castings are used as organic fertiliser.Westin Cape Town Rooftop Garden
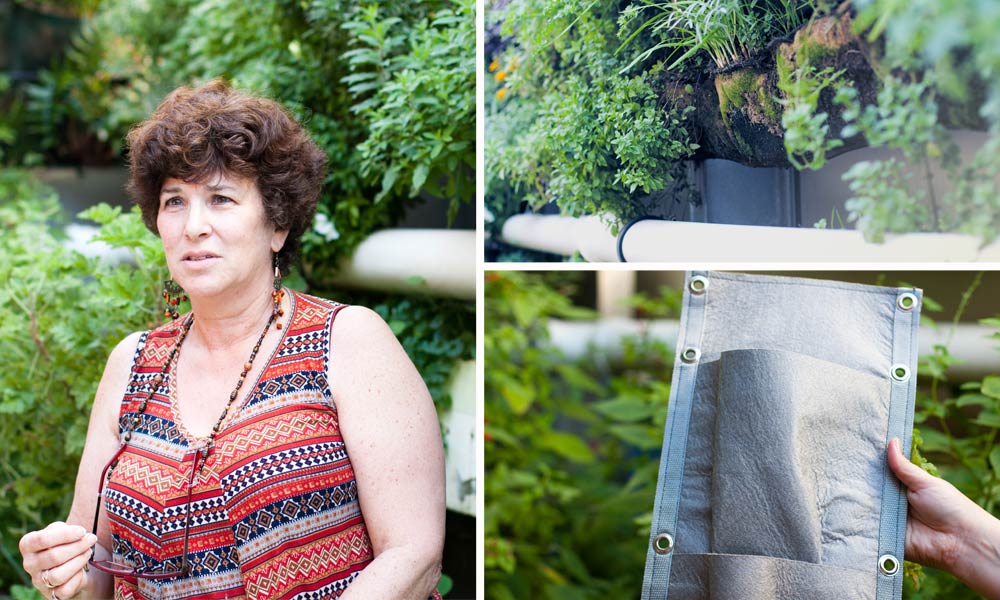
Marcelle works with the kitchen team to plant only what is in season and the chefs plan their dishes according to what will be available. They have also been taught how to harvest what they need, so the plants remain intact and can keep growing properly.

The garden is not without its challenges; the space is small and high and it took some serious planning to convert this otherwise unused area into this flourishing garden. Surprisingly the small area is affected by urban ‘microclimates’ – areas where the aircon extraction units are situated experience warmer air temperatures, where other areas have been destroyed by frost during winter. It’s taken a few years to get to know the ins and outs of the space, but the efforts have been rewarded. The garden boasts all kinds of herbs from tarragon and basil to stevia and chocolate mint. It also has beautiful edible flowers such as marigolds, snapdragons and violets, which all feature on the menu for flavour and aesthetics.Westin Cape Town Rooftop GardenWestin Cape Town Rooftop Garden
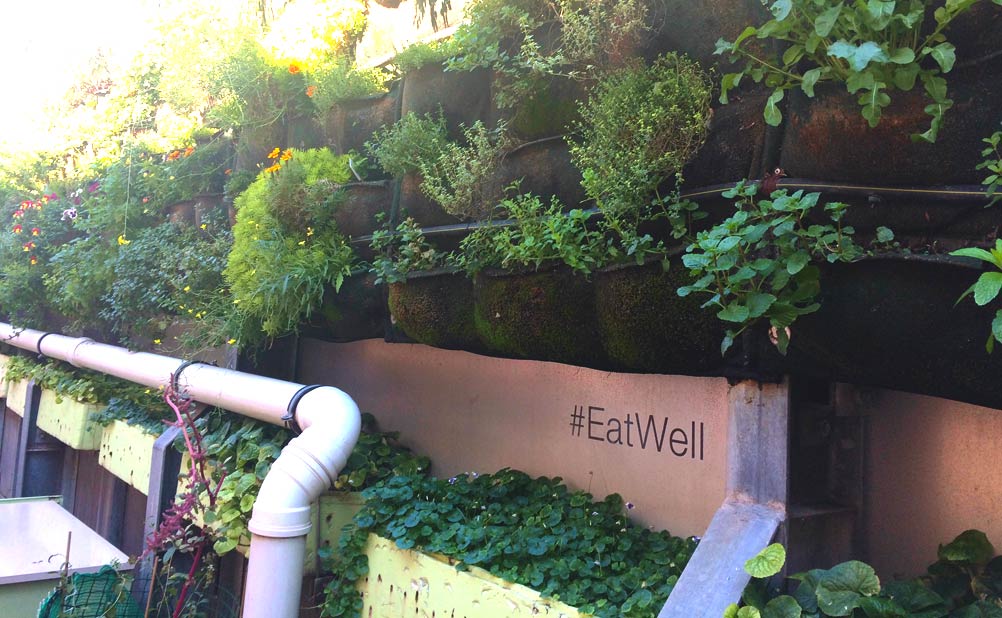
It just goes to show that no matter what your space and climactic limitations, growing your own is possible. This difficult space has been converted into a thriving little garden that supplies the restaurant and serves guests 365 days a year. Perhaps it’s time to relook at that unused section of your balcony, or that odd wall where nothing quite fits, and see its true potential.

on19restaurant.co.za

Delicious produce is grown in healthy, living soil. #Harvesttotable series brought to you by Reliance Compost.Reliance Compost

Beers, Burgers & Blues at the Inaugural Old N1 Country Craft Beer Fest

This weekend saw beer lovers head into the country and descend on, funny enough, a winery. The winery in question was Du Toitskloof and beer lovers were there for the first, Old N1 Country Craft Beer Fest – try say that fast after a few beers. The fest was relatively small but it was full of country charm, character and handful of tasty country craft brews.

Eighty bucks got you in and it included a plastic pint glass, which the brewers we eager to fill with free tasters. The brewer line up included: Breederiver Brewing Co., Raw Craft, Triggerfish, Saggy Stone, Boet Beer, Zebonkey, Wild Clover and Everson’s Cider. The line up seemed small on arrival but there were plenty of beers to get through during the day.

N1-country-beer
There were some interesting brews on offer including a saltwater weiss and a schwarz (black) weiss from Zebonkey, a pomegranate cider from Everson’s and Saggy Stone’s first IPA – which was brewed on their new Spadoni system. As I made my way up and down the line I tasted everything from a lager, a pilsner hybrid, and a pale ale to a brown ale, a stout and a black IPA.

There really was a great diversity on offer but the one that kept my crew and I coming back was Saggy Stone’s IPA. Even though brewer Adrian admits there are some things he’d like to tweak, the brew was bold, fresh and hopped with Cascade and Amarillo. It was definitely my beer of the day.N1-country-beer

N1-country-beer
As far as the rest of the festival goes, the setup was slick and easy to navigate. There was food on offer from Cape Town food trucks Meisies, Boulevard82 and Durban’s Finest Curry and I devoured a bacon burger from the Meisies Kitchen. The turnout was great and so was the music line up of the Blues Broers followed by Valiant Swart. There was even a kids entertainment area, which is always a win for parents at beer fests. All in all I’d give the Old N1 Country Craft Beer Fest a solid pat on the back. It was everything it promised to be and you can’t ask for much more than that. Let’s hope they do it again next year.

DIY Pomegranate Salt

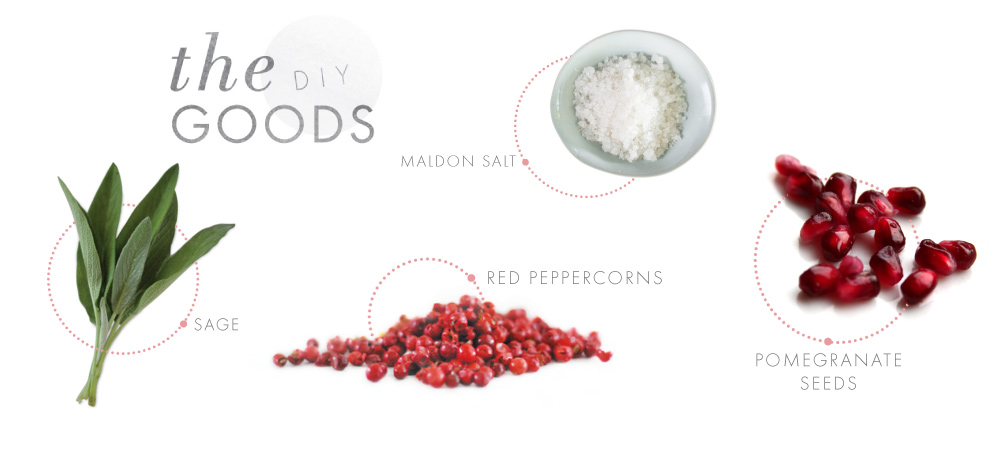
Pomegranates truly are a wonder of nature. Once you crack through the leathery exterior, their flesh is made up of mesmerising jewels, or rubies, with a flavour that is perfectly sweet and tart at the same time. Pomegranates are widely used in Middle Eastern and Mediterranean cuisine, usually anointing salads or forming part of marinades made with sticky pomegranate juice, which can be found in the frozen section of most stores or as a molasses (found at Chef’s Warehouse). Pomegranates happen to be in season at the moment, so the next time you pick one up to dress up your next salad make sure to spare a little juice for this ‘Love Salt’. We like sprinkling it on pretty much anything that needs a little fancy-ing up – cookies, cakes, roast chicken, salads, you name it! The flavour of the pomegranate juice will be quite delicate, but the colour will most certainly not be!

What you’ll need…

4 Tbsp (60 ml) Maldon salt
3 Tbsp (45 ml) pomegranate juice
2 Tbsp (30 ml) red peppercorns, crushed
1/2 tsp )2.5 ml) sage, dried
Pomegranate Salt

You can make pomegranate juice by putting some pomegranate seeds on to a plate, squash them gently with a fork and strain. You can also use store-bought pomegranate juice.

Splatter a piece of wax paper with the pomegranate juice using a spoon or pastry brush. Sprinkle the salt over the juice on the wax paper and stir gently with a fork. Splash a little more pomegranate juice over the mixture if you want a more intense pink colour. Stir until the salt is well coated. Mix in the peppercorns and sage and carefully spread the mixture out over the wax paper and leave to dry.

Once it has dried, store in a small air tight jar or bowl. It will keep for about one week.

Keen to get even craftier this weekend? See the rest of our weekend projects HERE.

Striped Horse Craft Beer – European tradition, reborn in Africa

Now is truly a rewarding time for beer lovers as unique and increasingly diverse offerings are being brought to market. There is a beer renaissance happening as the grip of the formulaic beer giants loosens and craft beers are being consumed on a larger scale.

For Striped Horse it has been impossible not to wade in and contribute to this contemporary return to the roots of beer brewing. They bring their crisp refreshing beers to you in the form of a lager, an award-wining pilsner, and an ale (coming soon) that are perfect for those hot African days and nights.

The Master Brewer

The Striped Horse master brewer, Wolfgang Koedel, has 25 years of experience in the industry and is fiercely committed to achieving the clarity, quality and flavour that only small-batch, slow brewed craft beer can deliver. European-trained, internationally experienced and locally-based, he is a craftsman uniquely qualified to produce a beer inspired by Europe but born in Africa.
Striped-Horse-Lager

striped-horse-pilsner

The Striped Horse Ale, to be launched in July, is an easy-drinking golden ale with a fruity malt backbone and delicious hoppy finish – for a deep, eclectic, distinctive beer experience.

Striped Horse beers have had phenomenal success in penetrating the South African beer-drinking market since they launched in October 2014. The lager and pilsner are a popular choice on tap in many of South Africa’s trendiest bars and restaurants and the 330 ml bottled beers are available at most top liquor outlets.

Big news in July

Along with the ale launching in July comes the very exciting news of The Striped Horse – the brand’s flagship restaurant and bar opening at a prime location on the beachfront in Muizenberg. Known as a favourite beer amongst surfers this location it is bound to become a very popular watering-hole all year round.

stripedhorse.co.zaFacebook | TwitterInstagram

Biologic Farming Reaps Rewards at Avondale Wines

Reliance Compost

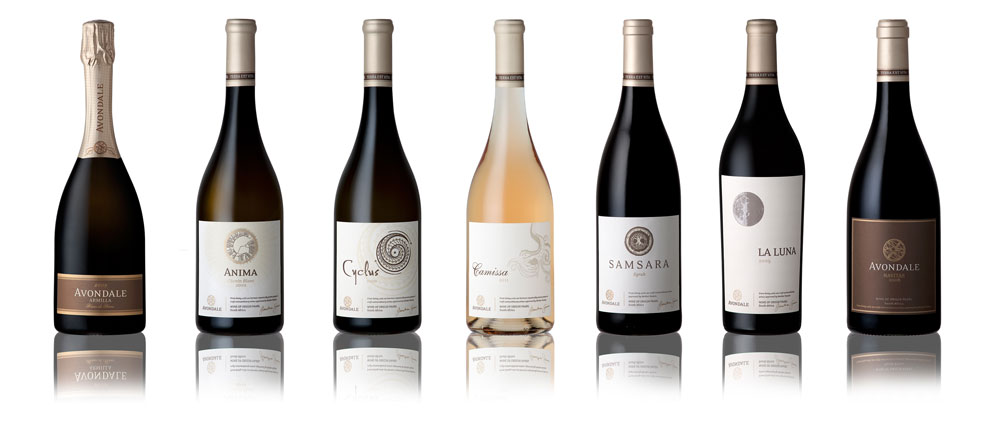
Avondale wines
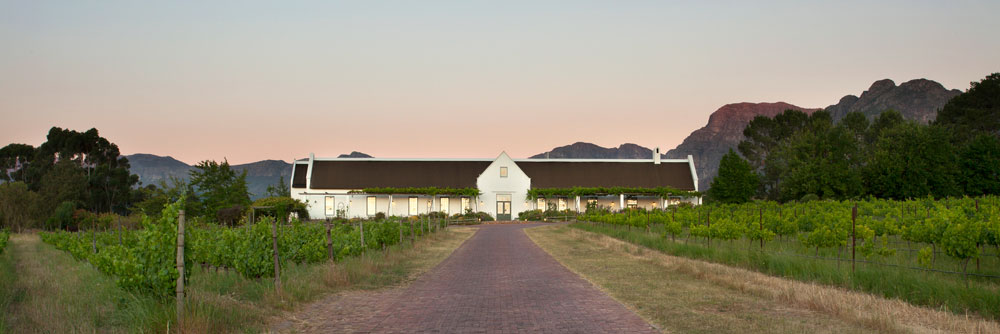
Every wine estate or farm has its way of doing things – there are family secrets, generational improvements and modern discoveries that all have a part in achieving the ultimate goal – making the very best wine possible.

At Avondale Wines, it’s a little bit of all of this rolled into one, but with one defining difference that is neither a secret nor a sudden discovery, but instead a step backwards to the way things used to be done. Their ethos tells this story in three simple words ‘Terra est Vida’ or ‘soil is life’. While this may seem an obvious place to start where farming is concerned, the fact is, that in an age of modern agriculture, soil health is often something that is pushed to the back of the queue. This is especially true when it comes to talking production numbers and yield per square metre.

Proprietor Johnathan Grieve, believes in making wine that truly reflects the character of Avondale – wines that are unique and authentic. As far as this family-owned estate is concerned, the only way that this can be done is through a truly biodynamic and organic approach. 

Avondale WinesAvondale Wines
Avondale has been under cultivation since 1693, and, like most, used  conventional farming methods to produce their wines. Despite these traditional, and at times aggressive farming methods, the wines coming from the farm were still very good, albeit rather one dimensional.

The Grieve family bought the farm in 1996 and, as with any farming venture or business that relies on the grace of Mother Nature, there were ups and downs. At one point the farm suffered a terrible mealy bug infestation that resulted in an entire crop being written off. Wet winter weather made spraying pesticides difficult and this was one of the things that kickstarted a thought process about looking into other methods. It became clear to the Grieve family that using chemicals was a bit like running on a hamster wheel – once you’re on, you can seldom get off. They felt pressure from chemical companies to use products to fix problems, which invariably led to other problems, for which there was yet another chemical solution. It was a vicious cycle that just did not feel right and so they started looking at alternative, greener options.  

They looked at the farm and its environment a little differently, specifically the terroir, realising just how unique it was. They worked out that you can’t explore or promote the character of the terroir via conventional farming and this compelled them to make the switch to organic methodology. To go back to working with nature, using natural processes and minimising the amount of man-made interference.     

The process to move to organic production was a slow and steady one, not something that could be managed simply by going cold turkey. It was through touch and feel that they carefully worked to remove one chemical and then another, as well as looking at how to help boost the soil’s natural qualities. It took the better part of a year, but soon the estate was 100% chemical-free and showing glowing results. The overall ethos Avondale adopts can be described by a term that Johnathan has coined ‘Biologic®’– which combines organic ideologies, biodynamics and science to create an all-encompassing mindset, allowing the true character of the grapes to shine through. They treat their soil, vines and environment as one intrinsically linked entity.

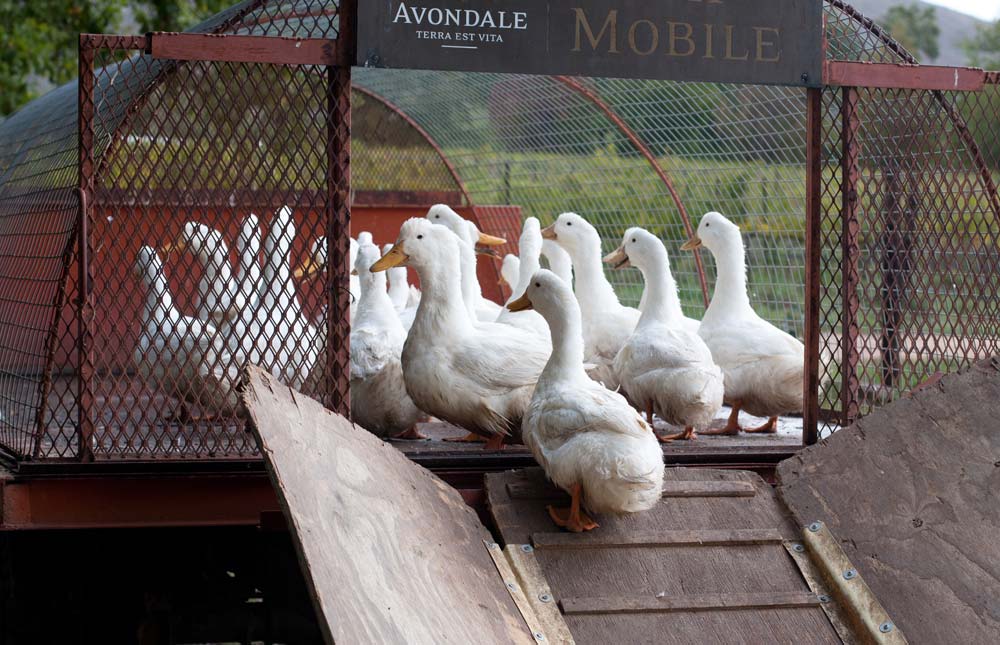
This ethos goes further than simply forgoing chemicals, it means adopting a completely holistic approach on the farm. It’s about restoring health and balance from the soil up and treating it as the living system that it is. So much so that they’re using natural predators as a form of pest control –  a wasp species combats mealy bug and ducks roam the vineyards to keep the snails at bay. They utilise cover crops around the base of the vines to ensure that the soil is protected from the heat in summer and from rain erosion during winter time. Every decision they make is one that promotes life and the living system of the farm. Avondale Avondale wines
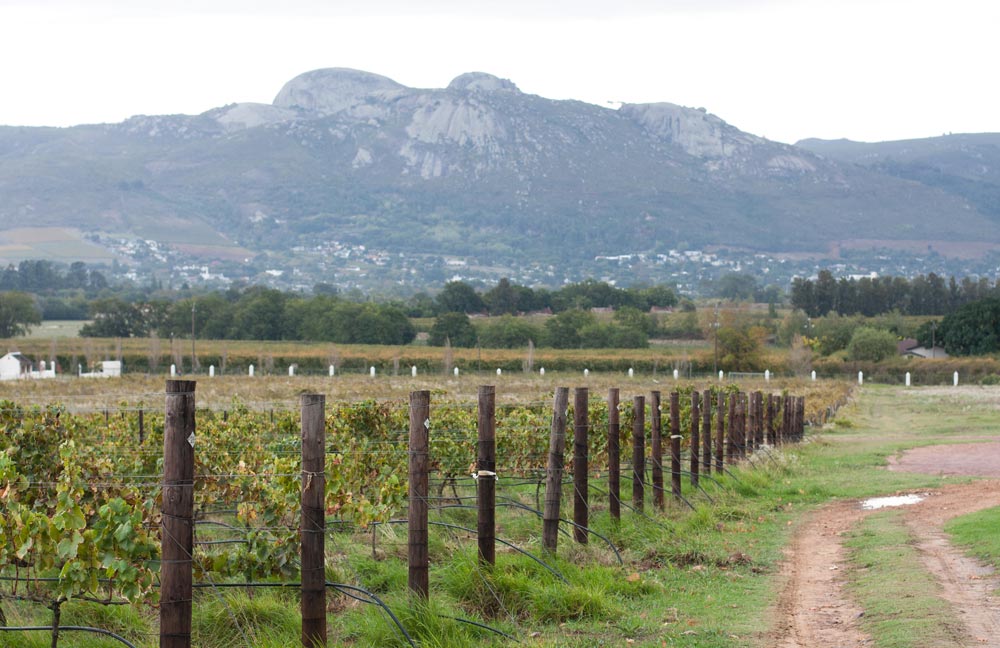
Avondale is home to 13 different soil types, each with a specific quality that relates to and benefits the grape varietal that is planted on it. They focus on working on the soil substrate, starting with the humus, the substance within the soil that provides nutrients for plants and increases water retention. The humus is hugely vital to soil health and needs to be fed and protected so that it can manifest its life-giving qualities. The farm follows a lunar planting calendar, whereby plants are planted, harvested and sowed according the phases of the moon. It is believed that these energies affect the taste of the wine. Each day of the lunar calendar is listed as either a root, leaf, flower or fruit day and can affect the growth of certain plants. It can also slightly alter how wines may taste depending on which day the wines are drunk.

With anyone doing things differently, the end result should always warrant the effort put into making the change, and Avondale’s wines certainly reflect that soil character. The condensed range of hand-harvested, naturally fermented wines are elegant and restrained and yet all represent the terroir so boldly. It’s no wonder that so much care has been taken to ensure that the wine process is simplified, the taste is pure and full of the character that makes Avondale unique.Avondale Wines

avondalewine.co.za

Delicious produce is grown in healthy, living soil. #Harvesttotable series brought to you by Reliance Compost.Reliance Compost

Responsible Living at Grand Designs Live 2016

Miele leaderboard-banner
In its seventh year, Grand Designs Live now brought to you by Black+Decker, has proven to be the leading contemporary home, design and garden show in South Africa. Every year legions of fans return to the event, inspired by its informative, innovative and interactive nature, and keen to learn about the latest trends, both locally and abroad.

This year’s theme with a cause that should be dear to all of us: Responsible Living. As conscious consumers it is now imperative that we make more eco-friendly choices and live in a way that promotes awareness and sensitivity to our planetary needs. Grand Designs Live takes this issue very seriously and will be showcasing numerous ways in which visitors can bring this thinking to life, and hopefully make real and meaningful impact on the world we live in.

The core Grand Designs Live experience remains much the same, with the main areas being Grand Gardens, Grand Interiors, Grand Build and Grand Kitchens and Bathrooms. Here you’ll find all the best products as well as talks and demonstrations illustrating global best practice in these different fields.

The entrance at this years show is going to feel completely different, as patrons will get to experience the incredible Central Boulevard Lampshades, a series of oversized lampshades hanging from the ceiling, designed by fresh young talent and covered in fabrics from Black Fabrics. This innovative initiative will give up-and-coming designers the opportunity to showcase their skills whilst contributing to a really eye-catching feature. And once guests have walked through this magical boulevard they will come across an exciting new central feature, appearing for the first time at Grand Designs Live. It’s a massive interactive area featuring the best in design trends, expert opinions and celebrity savvy advice. This space is split into two, The Easylife Kitchens Celebrity Chefs Theatre brought to you by Food & Home Entertaining Magazine, and The Waterwise Garden Theatre, brought to you by GLC Design Studio and Garden and Home Magazine.

The Waterwise Garden Theatre is an informative, inspirational place where guests can really engage with the realities of South Africa’s water dilemma. In reality, we are a water-stressed country, and predictions are that the demand for water will outstrip supply by 2025. A change in attitude and behaviour is needed, and this is where you can find ways to use water more wisely. In addition there will also be numerous experts on hand, each giving different insights into trends and techniques, making your green-finger experience all the more enjoyable and effective.

The Easylife Kitchens Celebrity Chefs Theatre brought to you by Food & Home Entertaining Magazine, hosts much loved celebrity foodies including the highly experienced Adrian Vaughn of Lacuna Bistro @ The Maslow Hotel, creative Amy Butler from the Food Design Agency, multi award winning Jonathan Roos at the Inter-continental OR Tambo and Pastry Chef Minette Smith who will be sampling, demonstrating and sharing advice on how to create the perfect meal, leaving you with all the passion and knowledge to repeat these in your own kitchen.

This space backs into Grand Interiors, brought to you by House and Leisure Magazine, plays host to four unique, immaculately styled room sets, featuring bespoke creations by Nicola Davis Interiors, Create Space Lab, House and Leisure Room Sets, Megan Parker Interiors and Prime Home. These highly respected names will ensure that this is not just a beautiful space, but an ideas hub where you can quiz our experts on their methods and philosophies. It’s all been designed to help you make the most of your own personal space, so if you’re looking for fresh ideas and ingenious insights, then be sure to spend some time in this inspiring area. Grand Designs Live: the leading contemporary home, design and garden show in South Africa.
Grand-Designs- Live

Grand Build will feature an incredible, instructive DIY Theatre, courtesy of Black+Decker. The DIY Theatre will also play host to incredible experts who will be giving all the secrets and tips needed to make your home improvement experience all the more fruitful. Brand new to this year is the Black+Decker DIY Workshops where you’ll get to roll up your sleeves and get involved with fun and exciting activities aimed at bringing out your inner handyman or woman. These range from learning how to make desk lamps and hanging lights, to fun and interactive spot races against the clock and everything you need to know about building your own herb boxes. The best thing? You get to walk off with your creation and stand to win amazing prizes. Black+Decker will also be hosting the Tool Exchange, a brand new initiative where you bring along your old Black+Decker tools, hand them in, and then get to purchase either a drill, grind-saw, grinder or sander for only R99.00. It’s happening once-off…only at Grand Designs Live. And to top it all off, the DIY Guru Search is on again, so if you want to keep up to date with who it’s going to be, then make sure you follow the hunt on the Grand Designs website or on social media.

The Grand Kitchens and Bathrooms area will once again showcase the best of both of these worlds, with novel and stylish ideas being presented in the Kitchen Theatre, hosted by Easylife Kitchens. Here you can expect the full array of bright ideas and must-have gadgets.

Then, because all this is undoubtedly going to work up an appetite, there’s the scrumptious Gourmet Area where you get to pamper your palate with the most delectable dishes imaginable or sip on cocktails at the exquisite Cocktail Bar. At the Grand Designs Live Emporium you’ll be greeted with an array of beautiful objects for garden and home, from jewellery and fabrics to scatter cushions and exotic plants and flowers.

Grand Designs Live takes place on 20-22 May 2016 at the Ticketpro Dome.

Venue: The Ticketpro Dome | Price: R95-00 (Pensioners and Students: R65, children under 12 free) | Contact: +27 11 835 1565

granddesignslive.co.za

WIN TICKETS TO GRAND DESIGNS LIVE – WE’RE GIVING AWAY 10 DOUBLE SETS!

miele-logo-banner

Baking with Miele – Cake Trends

Miele leaderboard-banner

Much like fashion and food, baking trends seem to come and go. When it comes to cakes, this is usually at a peak during wedding season when the well-known bakeries and patisseries of the world push the boundaries, using inventive techniques to create showstoppers for their clients. These trends usually filter down to home bakers and the results are plenty of fun interpretations of these ideas. Instagram is awash with stunning images of cakes from across the world, and we’ve identified four cake trends that we’ve seen popping up regularly – they are the naked style cake, cakes with yummy decor piled on top, watercolour cakes and drip cakes. We look at each of these in a bit more depth…

The Naked Cake
The naked cake was inspired and popularised by celebrity pastry chef Christina Tosi, of the Momofuku Milk Bar. Naked cakes come in a few shapes and forms – some are devoid of any icing on the sides at all, and focus on generous icing in between the layers instead. The second option is a thin layer of icing that is scraped closely to the cake, which gives the cake a beautiful ‘whitewashed’ effect. The thing to remember when baking a naked cake is that there is no icing to hide any issues, so the cakes need to be  perfectly baked, be as even as possible and have no crusty edges that would normally be trimmed. It’s a challenge, but the effect is so worth it. This look fits right in with a vintage or country chic party theme.
Naked Cake

The Drip Cake
Drip cakes seem to have been popularised by the team at Unbirthday Bakery in Sydney, Australia. With over 198k followers on Instagram, these ladies know what they are doing. They are a strictly no fondant bakery, which we can totally get on board with. These cakes are iced in a brightly coloured base buttercream and then chocolate ganache is used to create the drips down the sides. Although the ganache looks like it’s just been poured on and formed those perfect, mid-cake drips, it takes a little more skill than that. The technique is to spoon the ganache near the edge of the cake, coax it over with a spoon and then fill the top in with the rest of the ganache. It will probably take a few tries to master this technique… but then again, there’s never an issue with ganache covered fingers.
Drip Cake

Pile Up Decor
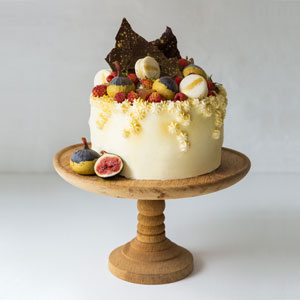
The pile of decor on top of this style of cake has also been popularised by Unbirthday Bakery and their most famous cakes combine the drip cake technique and the mass of goodies on top. This style is probably the most whimsical of all, and is really only limited by the baker’s imagination. We’ve seen everything from gold dusted Oreos, to KitKat fingers, Flakes, Ferrero Rocher’s, caramel popcorn, macarons and more stacked on top. The great thing about this trend is that the point is to go wild, get creative and use your own personal favourite ingredients. Another trend that is also combined in these cakes is piping with a tight star nozzle to fill in gaps. These cakes are a little wild, a little crazy and probably not for everyone, but one thing is for sure, they make a serious centrepiece for any celebration. Just be sure to keep an eye on those toppings, as it’s super tempting for guests to pinch something to nibble on.
Pile Up Cake

Watercolour Cakes
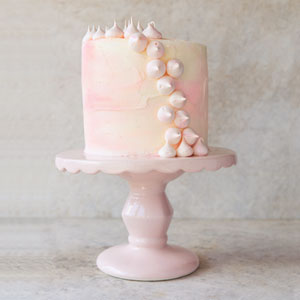
Watercolour cakes have seen a huge surge in popularity and there are two sides to this coin. Some seriously artistically inclined bakers have taken to actually painting elaborate and beautiful images onto fondant-wrapped cakes and the results are quite staggering – like works of art that are almost too good to eat. For some mind-blowing examples search watercolour cakes on Pinterest and see what pops up, you’ll be amazed. We’re firmly on the buttercream side of the fence though, and since painting elaborate designs on this style of icing would be seriously tricky, we favour the effect achieved by blending more than one colour of icing. It’s a fairly easy technique to master and the best part is that errors can form part of the look – your mistakes can be easily blended to look purposeful.
Watercolour Cake

So now you know what’s hot, its time to try your hand at our versions. Be creative- we’ve seen examples where these trends have been mixed and matched in one cake, you could even go as far as putting together a watercolor iced cake, with a drip ganache topping and pile it high with decor. The sky’s the limit really and the pleasure is all in the eating.

Be inspired by these other great cake recipes.

Enjoy your cake with a cup of perfectly brewed coffee made with your Miele coffee machine.

miele.co.za | Facebook

Miele leaderboard-banner

Cake Trends – The Drip Cake

Miele leaderboard-banner

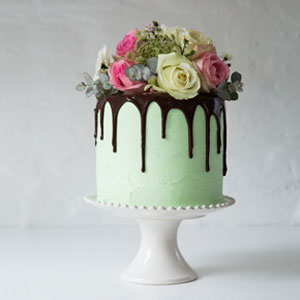
The Drip Cake – Chocolate Cake with Mint Buttercream and Chocolate Ganache

The drip effect cake is a hot trend for 2015/2016. The look is achieved with ganache and most are done over a pretty coloured base cake. Try your hand at it – just take your time to get it right. Learn more about these trends HERE.

Serves: 10 -12
Difficulty: Moderate
Preparation time: 30 minutes
Cooking time: 45 minutes

Cake
190 g [340 ml] cake flour
1/3 C (80 ml) cocoa powder
1 tsp (5 ml) bicarbonate of soda
1 tsp (5 ml) baking powder
150 g [180 ml) castor sugar
2 Tbsp (30 ml) golden syrup
2 eggs, beaten
150 ml oil
150 ml milk

Icing
150 g butter
500 g icing sugar, sifted
1 tsp (5 ml) mint essence
2 ml green food colouring

Ganache
½ C (125 ml) cream
200 g good quality dark chocolate, broken into pieces

fresh flowers

Cake
Heat the oven to 160 °C.

Grease two 20 cm straight-sided sandwich tins and line the bases with baking paper.

Sift the dry ingredients into a large bowl and stir in the syrup, eggs, oil and milk. Beat well and pour into the prepared tins.

Bake in the oven for 30 to 35 minutes or until the cake is cooked though when tested with a skewer. Turn out on a cooling rack, remove the paper and leave to cool.

Icing
Cream the butter until pale and fluffy, add the sifted icing sugar a little at a time until it is all incorporated. Add the mint essence and food colouring a little at a time, to reach the desired colour and flavour.

Ganache
Scald the cream in a small saucepan. Add the broken chocolate to a bowl. Pour the heated cream over the broken pieces of chocolate and mix well until smooth and glossy. Set aside to cool.

To assemble
Sandwich the cake together with a little icing; use the remaining icing to cover the cake. To create the drip effect, use a teaspoon to dollop ganache at intervals around the edge of the cake and use the spoon to gently ease over the side to form a drip. Then fill in the top of the cake as normal. Take it slow and do it bit by bit to get the right effect.

Note: the ganache must be cooled or it will melt the icing.

Garnish with fresh flower adornment of your choice.

See other hot cake trends for 2016 HERE.

Enjoy your cake with a cup of perfectly brewed coffee made with your Miele coffee machine.

miele.co.za | Facebook

Miele leaderboard-banner

Cake Trends – The Pile Up

Miele leaderboard-banner

The Pile Up – Orange Sponge with Lemon Butter Cream

A good cake is decedent at the best of times, but this look takes it to a whole different level. You are only limited by your imagination here!  See other hot cake trends for 2016 HERE.

Serves: 10
Difficulty: easy
Preparation time: 30 minutes
Cooking time: 30 minutes

Orange Sponge
360 g butter
360 g castor sugar
zest of 2 oranges
5 large eggs
360 g cake flour
2 tsp (10 ml) baking powder
pinch of salt
¼ C (60ml) orange juice

Lemon Butter Cream
150 g butter
500 g icing sugar
zest of 1 lemon
2 Tbsp (30 ml) lemon juice

Decoration
125 g raspberries
4 vanilla macaroons
3 chocolate shards
6 pieces of Turkish Delight
gold dust for dusting
(any additional décor of your choice)

Orange Sponge
Preheat the oven to 180 °C.

Grease and line the base of 2 x 18 cm round cake tins.

Cream the butter until light and fluffy. Gradually cream in the sugar and then fold in the orange zest.

Whisk the eggs together and gradually beat into the butter mixture. Sift together the dry ingredients and fold into the creamed mixture

Fold in the orange juice and pour into the prepared cake tins.

Bake for 25-30 minutes or until cooked through when tested with a skewer. Turn out on a cooling rack; remove the paper and leave to cool.

Lemon Butter Cream
Cream the butter until pale and fluffy, add the sifted icing sugar a little at a time until it is all incorporated. Add the lemon juice and zest. Mix well.

Using a little of the icing sandwich the cakes together, cover the whole cake with a layer of icing, keeping a little aside for piping. Cover the top of the cake with chocolate shards, berries, macaroons and Turkish delight and any other décor of your choice.

Using a tight star nozzle pipe little icing stars in the gaps on top and down the sides of the cake. Dust with gold dust and serve.

See other hot cake trends for 2016 HERE.

Enjoy your cake with a cup of perfectly brewed coffee made with your Miele coffee machine.

miele.co.za | Facebook

Miele leaderboard-banner

Cake Trends – The Watercolour Effect

Miele leaderboard-banner

The Watercolour Effect – Vanilla Sponge With Rose Buttercream

The delicate watercolour look is really popular at the moment and there are folks who are actually painting the effect using fondant icing as a canvas. We use buttercream to create a similar effect. See other hot cake trends for 2016 HERE.

Serves: 10
Difficulty: easy
Preparation time: 30 minutes
Cooking time: 45 minutes 

Vanilla Sponge
360 g butter
360 g castor sugar
1 Tbsp (15 ml) vanilla essence
5 large eggs
360 g cake flour
2 tsp (10 ml) baking powder
pinch of salt
¼ C (60 ml) Water

Rose Buttercream
150 g butter
500 g icing sugar
3 Tbsp (45 ml) rose water
a few drops of pink food colouring

baby meringues or any décor of choice

Vanilla Sponge
Preheat the oven to 160 °C.

Grease and line the base of 2 x 20 cm round cake tins.

Cream the butter until light and fluffy. Gradually add the sugar and continue to cream. Add the vanilla essence and beat to incorporate.

Whisk the eggs together and gradually beat into the butter mixture. Sift together the dry ingredients and fold into the creamed mixture, adding the water as you fold. Pour into the prepared tins.

Bake for 45 minutes or until cooked through when tested with a skewer. Turn out on a cooling rack; remove the paper and leave to cool.

Rose Buttercream
Cream the butter until pale and fluffy, add the sifted icing sugar a little at a time until it is all incorporated. Add the rosewater and mix well. Separate approximately a third of the icing into a separate bowl and colour with a few drops of pink food colouring to achieve a pretty pale pastel pink.

Sandwich the cakes together using a little of the plain butter icing and ice the cake with the remaining plain icing. To create the watercolour effect, spread the pink coloured icing over the cream coloured icing, using a palette knife to gently blend the two to create a watercolour effect. Decorate with baby meringues or décor of choice.

See other hot cake trends for 2016 HERE.

Enjoy your cake with a cup of perfectly brewed coffee made with your Miele coffee machine.

miele.co.za | Facebook

Miele leaderboard-banner

Cake Trend – The Naked Cake

Miele leaderboard-banner

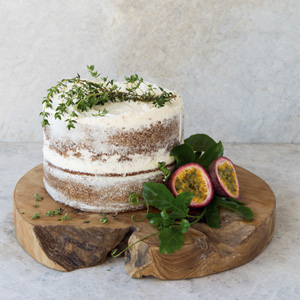
NAKED CAKE – Vanilla Sponge with Thyme and Granadilla Buttercream 

The naked cake is a huge wedding trend at the moment but the same technique can be applied to any cake. Its ideal for those who prefer a little less icing.  See other hot cake trends for 2016 HERE.

Serves: 10 -12
Difficulty: easy
Preparation time: 30 minutes
Cooking time: 35 minutes

Vanilla Sponge
360 g butter
360 g castor sugar
1 Tbsp (15 ml) vanilla essence
5 large eggs
360 g cake flour
2 tsp (10 ml) baking powder
pinch of salt
¼ cup (60 ml) water

Thyme and Granadilla Buttercream
150 g butter
500 g icing sugar
1 tsp (5 ml) fresh thyme, picked
pulp of fresh 2 granadillas, sieved to remove pips

To serve
½ cup (125 ml) lemon curd
10 fresh thyme sprigs
4 granadillas, halved

Vanilla Sponge
Preheat the oven to 160 °C.

Grease and line the base of 2 x 20 cm round cake tins. Tip: with a naked cake style of icing you want as few imperfections as possible as the layer of icing will be thin. Be sure to grease tins well and do not let the cakes over bake as crusty edges will be hard to work with.

Cream the butter until light and fluffy. Gradually add the sugar and continue to cream. Add the vanilla essence and beat to incorporate.

Whisk the eggs together and gradually beat into the butter mixture. Sift together the dry ingredients and fold into the creamed mixture, adding the water as you fold. Pour into the prepared tins.

Bake for 45 minutes or until cooked through when tested with a skewer. Turn out on a cooling rack; remove the paper and leave to cool.

Thyme and Granadilla Buttercream
Cream together the butter and the icing sugar. Beat well. Add the thyme leaves and granadilla pulp and mix to combine.

To assemble
Spread the lemon curd in between the layers of cake and sandwich together. Spread the icing over the cake, use a palette knife or an icing scraper to apply a thin layer all the way, not worrying if there are gaps – as this is intentional in the look. The colour of the cake should peek through the layer of icing to give the cake the ‘whitewashed’ look. Decorate with thyme sprigs and granadilla halves.

See other hot cake trends for 2016 HERE.

Enjoy your cake with a cup of perfectly brewed coffee made with your Miele coffee machine.

miele.co.za | Facebook

Miele leaderboard-banner

The City of Eden – Turning Empty Spaces into Edible Landscapes

Reliance Compost
Let’s start with a story:

Every afternoon, Anna Shevel used to take a stroll along the Seapoint Promenade. One day, she noticed a little flowerbed emerging in what was previously a derelict patch of land. Two homeless men were tending to it – clearly they had adopted this land as their own. With each passing day Anna watched as the flowerbed began to flourish into a little garden. Under the care of the two men it was gradually developing into an eclectic hodgepodge of weird and wonderful flowers and a curious curation of found objects: an old train set, a Smurf, a photo album, a porcelain teacup.

As the little garden grew, it seemed to bring the community of Seapoint together – tourists, children, joggers – all would gather around the tiny garden, some even leaving small gifts to join the treasure chest of goods. And Henry and Ernest, the men who had created the garden, underwent their own personal transformation: they stood taller and prouder, they grew in confidence, they became part of the community instead of living outside of it.

Whilst most people would watch this event fondly and then simply move on, Anna began to think about how this single transformative process could be expanded for a greater good. She began to notice other areas of under-utilised space in the city, how much empty and wasted land there was. And she began to see these empty spaces as opportunities to feed and empower people, to make the city more productive and more beautiful.
City of Eden
Enter The City of Eden: a network of skilled individuals invested in turning under-utilised public and private spaces into visually spectacular edible landscapes through a combination of landscape architecture, permaculture and food forest ecology.

“I have always wanted to be a part of the solution rather than the problem,” says Anna. “The City of Eden is my way of collaborating with experts across a range of complementary fields to turn our empty spaces into productive, edible landscapes.”

City of Eden
Anna’s background in sustainability has put her in good stead: for 5 years she headed up the education department at GCX Africa, training corporates in sustainability practises ranging from water management to becoming a carbon analyst. Working with some of the country’s top experts in the sustainability field meant that she gained valuable knowledge and built an extraordinary network.

From a medicinal herb garden created at The Haven Shelter in conjunction with Urban Harvest, through to a large-scale indigenous edible landscape currently being planned at a housing development in Pelican Park, The City of Eden has invested extraordinary energy into growing food in urban spaces. And every year their expertise seem to grow: organic, chemical-free planters; good-food consulting to businesses and restaurants; and CSI gardens created in impoverished communities.

“With my background in environmental sustainability I gained insight into the industries that most affect our environment. It became clear that changes to our industrial food system are where the most positive environmental impact can be made by everyday people,” says Anna.

As The City of Eden expanded, so Anna’s network of ethical, organic farmers, producers and restaurants began to grow. “I was in awe of these change-makers,” Anna says. “I wanted to share their work with others, to expose everyone to ethical farming practices and inspire sustainable food choices.”

In July of 2014 Anna established Food Route, providing organic and urban farm tours to the public. The tours are varied, including a bee-keeping and bread-making tour, organic and biodynamic wine tours, an organic chocolate-making tours and a local township tour of various organic micro-farms in Kayelitsha.
City of Eden
City of Eden
“Our food choices are potentially the single greatest effect that we can have on the planet,” says Anna. “Food Route is designed to showcase a network of extraordinary individuals who are working hard to grow and produce honest, ethical, organic food in a way that supports both our health and our planet.”

Closest to Anna’s heart is her Historic City Farm Tour, which looks at the connection between people and food, the politics of food, and how societies have formed around it. Highlights include the restoration of The Company’s Garden, which was designed as a replica of the original Dutch farming methods. Among the various heirloom varieties that flourish in this garden is the city’s oldest cultivated fruit tree, still standing tall at over 300 years old. The tour ends with a visit to the ‘guerrilla farmers’ who are squatting on land currently owned by the city’s military base.
City of Eden
Anna is a whirlwind of passion and ideas, dynamic, collaborative, smart as a whip. She is also a captivating storyteller. As I leave her company, she tells me a final tale…

“I studied industrial design at UJ,” she says. “I’ll never forget the day our lecturer told us that industrial design only came about as a profession to get people to buy more stuff – a way to kick-start the economy after the Great Depression. One way to get consumers to consume was to shift focus to the aesthetics of products. This was done by introducing a perceived obsolescence (think fashion and trends), and a planned obsolescence (like built-in breakages or newer models). The moment our lecturer told us that, I realised that there was nothing I could ever warrant creating simply to end up in a trash heap. The only products I could justify designing were the colourful recycling bin lids at UCT, which transformed ordinary bins into “separate at source” recycling stations. I found myself driven by work that I knew would have a positive environmental impact, work that would make a difference.”

And it seems she hasn’t stopped since.
City of Edencityofeden.org | foodroute.co.za

Delicious produce is grown in healthy, living soil. #Harvesttotable series brought to you by Reliance Compost.Reliance Compost

DIY Marbled Clay Bowls

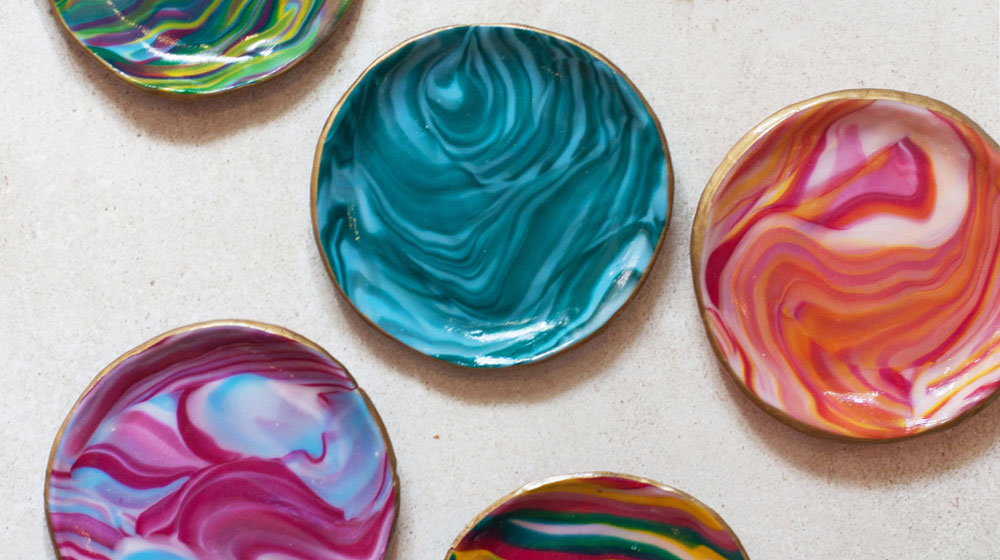
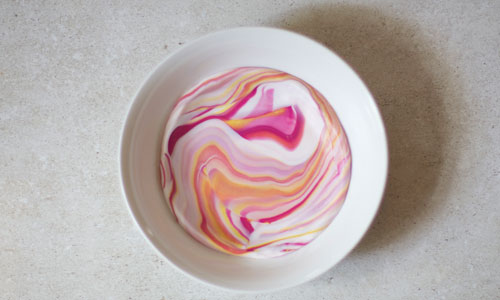
It’s getting darker and colder every day, you’re definitely going to need a project to keep you busy while you stay warm inside this weekend. These beautiful dishes work perfectly as a ring and earring holder on your bedside table – they also make great gifts.

What you’ll need…

– a selection of white and coloured oven-bake clays (we used Cernit® clay with a porcelain finish)
– rolling pin
– jar or bowl to use as a size measure (we used a bowl measuring 10.5 cm in diameter)
– small oven-safe bowl to bake in
– gold liquid permanent marker, Sharpie, or gold craft paint
– glaze (we used Dala – Deco Varnish High Gloss)
– small, soft craft paintbrush for glaze

How to make…

Preheat the oven to 120 ºC.

The total amount of clay used per bowl equals roughly one block. The easiest way to measure this is to cut the blocks of clay in halves or quarters, depending on how many colours you want per bowl. Mix and match your blocks of clay into the desired colour combination, ensuring that each group equals a block size.

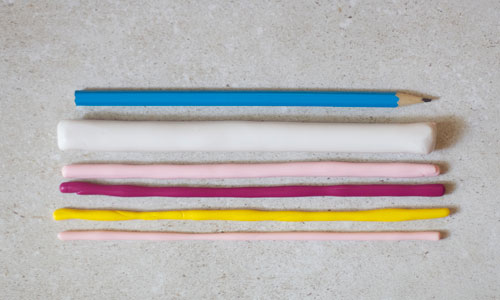
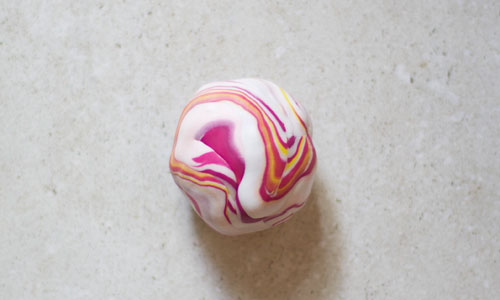
Start by rolling the white clay into two rolls approximately the length of a pencil. Do the same with the selected colours. Roll each colour out to the same length, but different thicknesses – the size of the roll will depend on the amount of each colour you want to have in your finished bowl.


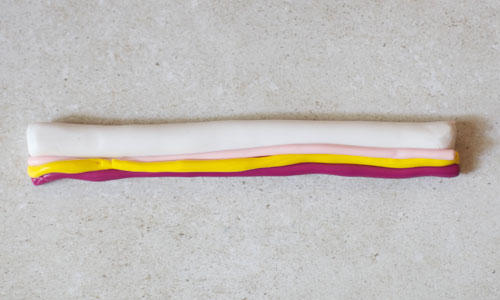
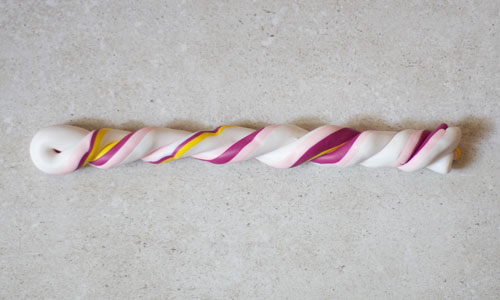
Roll the white and coloured rolls into one big roll and twist to combine (use same action used to wring a towel).

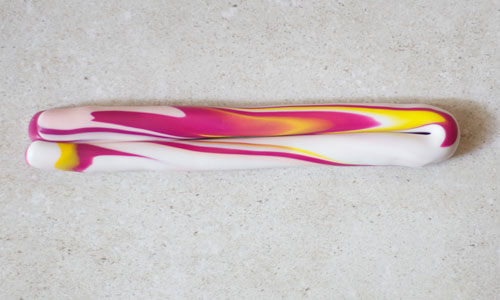
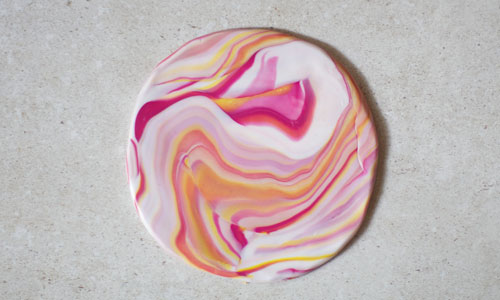
Roll the twisted clay to double the original length and fold it back onto itself. Twist it again to give it a candy cane look. Repeat the rolling, folding, twisting and rolling again process twice, or as many times as desired, bearing in mind that the more you twist and roll, the more the colours will blend. Play with the clay, fold it back onto itself, twist it and spiral it until you have a desired pattern. To test the design squash a small piece into a flat disk, if you are happy with the pattern, stop, if you want to blend more, continue the twist and blend process.


Once satisfied that the colours are blended and marbled enough, roll the clay out flat in a circle, or in a shape large enough to cut out your desired circle size. Use a bowl or something that is the correct size as a guide and using a craft blade or knife, cut the bowl shape.

Place the cut circle into an oven-safe dish; the dish will guide the shape of the clay as it bakes. Press the edges down lightly to ensure they don’t run thinner than the rest of the rolled clay, and so that it forms a flat rim on which the gold finishing can be painted.


Bake the dish for 30 minutes, ensuring that it cooks slowly and does not brown (note: if using a different brand of clay, check the specific baking instructions). Remove from the oven and let the bowl cool down, this will allow it to set.

When the dish has completely cooled down, use craft paint or a liquid marker to add the gold accent to the rim. Allow to dry.

Once the rim is completely dry, use a soft paintbrush to paint on a layer of glaze to give the bowl a glossy finish.

Voila! Gorgeous marble clay bowls to hold your precious items.
DIY Marble-Bowl-

Check out our other weekend projects to keep you busy.

Amber Ale Sticky Lamb Shanks with Bacon Sweet Potatoes

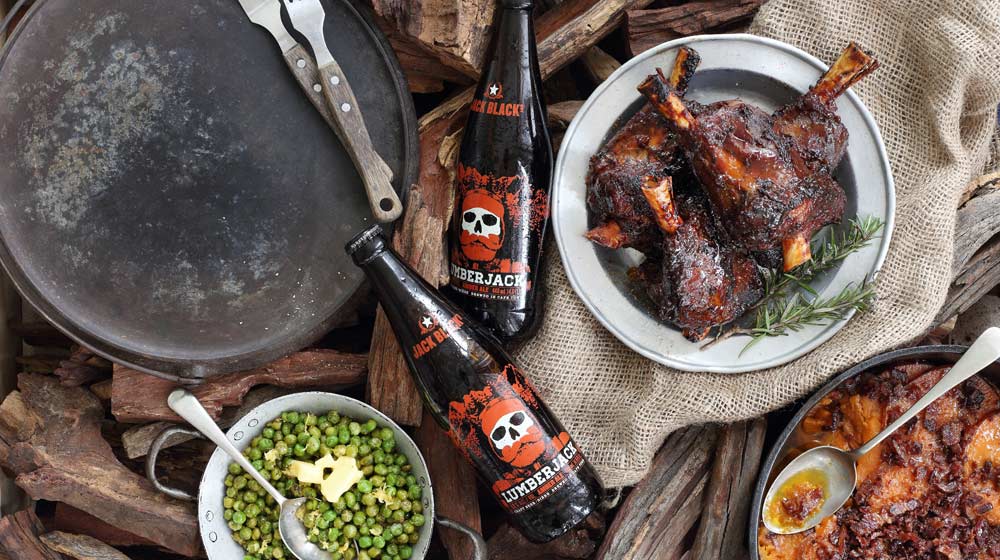
Sunny skies, fynbos, wide-open spaces…there is a reason lamb from the Karoo tastes amazing. Did you know that ‘lamb shank’ is Latin for ‘meat lollipop’? Okay, I made that up, but it definitely should be. Besides sounding like the coolest part of a lamb, (say ‘lamb shank’ out loud a couple of times), the shank is also one of the tastiest. So treat yourself this weekend and feel like a proper cave dwelling individual, as you tear off mouthfuls of sticky, sweet amber ale-glazed lamb.

Need to know: Shanks are a cut taken from either the shoulder (fore shank) or arm of a lamb, or the upper part of the leg (hind shank). This cut can be quite tough, so is best when braised or roasted for a few hours, until it becomes fall-apart tender.

Beer Pairing: Jack Black Lumberjack Amber Ale
When cooking with beer the rule of thumb is to pair the dish with the beer that you used to cook it. In this dish the basting sauce for the shanks is made with Jack Black Lumberjack Amber Ale. It’s a roasted malt amber ale with a rich red colour, and is perfect for washing down roasted and caramelised meat.

Serves: 6
Difficulty: easy
Prep time: 1 hour
Cooking time: 2 ½ – 3 hours in oven, 15 minutes on braai

Marinade
splash of oil for frying
¼ C (60 ml) onion, finely chopped
3 garlic cloves, finely chopped
350 ml tomato sauce
1 C (250 ml) Jack Black Lumberjack Amber Ale
5 Tbsp (75 ml) honey
5 Tbsp (75 ml) dark Soy sauce
1 tsp (5 ml) ground black pepper
1 tsp (5 ml) paprika

Lamb Shanks
6 free-range lamb shanks
6 whole garlic cloves, squashed
6 sprigs of rosemary, roughly chopped
olive oil
dry rub of your choosing (we use NOMU Roast Rub)

 Bacon Sweet Potatoes
2 – 3 large jewel sweet potatoes, sliced into rounds
1 packet streaky bacon
¼ C (60 ml) brown sugar
200 g butter
2 cinnamon sticks

Marinade
Heat the olive oil in a medium-sized saucepan over a medium heat, and fry the onion until golden brown. Add the garlic and cook for another minute. Add in the rest of the ingredients and stir to combine. Reduce to a low heat, simmer and stir occasionally to combine the flavours. Continue to simmer until the sauce has reduced to a semi-thick consistency. Remove from the heat and set aside.

Lamb Shanks
Set the oven to 160 °C. Coat the shanks with olive oil, and then give them a generous coating of NoMU Roast Rub. Place the shanks into a roasting dish and scatter the garlic and rosemary in the dish. Cover with foil and bake until fork tender. The shanks will be finished on the braai, so they shouldn’t be fall apart tender at this stage. When the shanks are done, remove from the oven and allow to cool slightly. Once cooled, baste generously with the marinade. Braai over medium-heat coals and baste with every turn until you get a tasty, caramelised crust.

Bacon Sweet Potatoes
Grill, fry or braai the bacon slowly until it’s nice and crispy, then chop roughly and set aside. In a small cast iron pot, melt the butter and sugar together, and then add in the cinnamon sticks. Layer the sliced potatoes over the mixture, and season with salt in between each layer. Slowly simmer over medium-heat coals with the lid on, until the potatoes are cooked through. Sprinkle with the crispy bacon bits before serving.

Styled by Caro Gardener
amber ale shanks

Stokperd Design

Miele leaderboard-banner

Monya Eastman describes her previous self as ‘a corporate girl, stuck in an office, daydreaming about making beautiful things’, that was of course, before she made the bold call to bust free of corporate and get her hands dirty in her own design business.

Monya discovered a gap in the market when renovating her own home – finding it incredibly difficult to source pieces of furniture which fitted her style and necessities, she opted instead to design them herself, and thus Stokperd was born. Stokperd is the Afrikaans word for hobby (or stick horse if you translate directly) and it fits the idea of the business perfectly. Monya has done what so many wish they could do, by turning a passion project into a viable business.

All Stokperd items can be customised to client specs and wood preference. If you prefer something completely unique, or you have an odd space that needs an individual creation to make it work, Monya can visit you, measure the space, take your idea and work it into something beautiful and functional.

Stokperd

Are you doing anything remotely close to what you thought you would be doing when you were a
little girl?
My very first career choice came to me when I was watching the 80’s movie Flashdance, I was completely obsessed and decided I wanted to be a dancer, so no – it’s not even remotely close!

You’ve done what many people dream of doing, leaving the corporate world and pursuing your dream career, a very daunting adventure indeed; has it been as rewarding as you imagined?
It feels good to start something and to see it grow and evolve into something bigger. I never felt that my previous jobs defined me, and now I can say that my work is an extension of who I am, and that is the most rewarding part. But I must add that it’s not always as romantic as it seems – there’s anxiety and stress involved a lot of the time.

What is the most unexpected thing you have learnt through the experience of going it on your own?
I crave routine! When I left the corporate world I thought that I would never keep regular hours, and in the beginning I enjoyed being “organic” with my time, but now I work in a shared office space and keep a strict schedule, which works very well for me.

Have you ever created something for a client and then wished you could keep it for yourself?
Yes it happens, but it was particularly hard to part with the Nin desk – I am in love with it and plan to get one for myself as soon as we move into our new house.

All your products are named with funky, fun names and accompanying stories like ‘The Moop Table’, how do these come about?
When I started out, one of my first commissions was for the JR Ewing table, which was a real bad-ass as it took some time to get it right, so I thought this table needs a name and a story that is going to describe what I went through when we were making it. So now it’s become a thing – sometimes clients name the pieces too, like the Peggy cabinet, which was named after the buttoned-up copywriter in the Mad Men series, and if you know her character you will completely see the similarities.Yoko-desk_Stokperd
Your pieces are often more than just functional, they are pieces of art, what inspires your designs?
I feel strongly about furniture that enhances your life and is not just good looking for good looking’s sake. So I guess I will always look at the function of the piece for primary inspiration, and then figure out a way to make it look beautiful.

stokperd.co.za | Facebook | Instagram

Miele leaderboard-banner

A Barista in Your Own Home

Miele leaderboard-banner
Coffee culture has taken over the world and made coffee aficianados out of all of us. You can now make your very own gourmet coffee without having to leave home. Miele introduces two  new countertop coffee makers. The brand new CM7 models, which are able to prepare up to 20 different beverages, including various types of tea. The top-of-the-line model, the CM7500, even descales automatically”.

“Long black”, “Flat white”, ‘Espresso macchiato” and much more – in choosing from a wide range of specialty beverages, lovers of fine coffee can slip effortlessly into the role of barista. The range comprises 16 different coffee variations alone. And, if you fancy a cup of tea instead, the new Miele freestanding coffee machines are more than willing to oblige – black, herb, fruit and green tea can be brewed at their own ideal temperatures respectively.

Compared with Miele’s previous CM6 series, Mercia de Jager from Miele notes that the new CM7 models feature larger containers for water, beans and coffee grounds. She says that another new convenience feature is the coffee and teapot function: “When visitors arrive, the unit can deliver up to eight cups into a pot for optimum convenience.”miele coffee-machine

Thanks to a removable brew unit and the automatic rinsing of milk lines, Miele coffee machines set standards when it comes to hygiene. And the CM7 now even dispenses with the irksome chore of descaling. Notes Mercia: “This loathsome task can now be done automatically overnight when the machine is not in use. The descaling agent required is dispensed from a cartridge, which lasts for approximately a year.”

In terms of design and user convenience, Mercia explains that the Generation 6000 built-in models were the inspiration for the new countertop units, “This pedigree starts with the design of the fascia with its colour TFT display (C Touch), which guarantees a simple and intuitive user interface, and continues with the CupSensor that enables the central spout unit to automatically height adjust.”

Further convenience features include the One Touch for Two functionality for the simultaneous preparation of two coffees, the BrilliantLight LED spout unit lighting, and up to 10 customisable user profiles. The CM7 range comprises the CM7300 (black). The higher-end CM7500 boasts the additional automatic descaling functionality, a heated stainless-steel cup rack, as well as a chrome-plated recess liner.

There are so many incredible functions and thoughtful touches to these machines, making them the ideal coffee companion. These are just a few of our favourites…

Dishwasher-friendly: The ComfortClean system makes hygiene very easy. Many of the CM7 coffee machine parts, such as the water container and the waste container for example, can be easily removed and cleaned in the dishwasher.

Consistent quality: The brewing component is the “heart” of automatic coffee preparation. It can be removed and easily cleaned to ensure a hygienic brew unit, consistently high coffee quality, as well as increasing the longevity of the machine.

Pleasantly quiet: Miele coffee machines grind coffee particularly quietly, boasting impressively low noise levels and consistently perfect results.

Two for one: All Miele bean-to-cup coffee machines are equipped with the new OneTouch for Two function, as well as with the already familiar OneTouch feature. This function allows you to make two delicious coffee specialities at the same time by simply touching a button.

Perfectly heated cups and mugs: The integrated cup heater featured in Miele’s CM7500 model provides extra convenience: pre-heated cups available at any time. Coffee needs to be at the correct temperature for perfect coffee enjoyment. Only then can the aroma unfold and a wonderful crema form

Truly energy-saving: In the Eco mode, the coffee machine does not heat up until just before the first beverage serving for optimum energy savings. The Eco mode is a freely selectable optional function and can be activated or deactivated via the basic settings.

Perfect milk froth: With the Cappuccinatore, you can prepare hot milk or milk froth in no time at all. In just a few seconds, it heats and froths the milk directly into the cup or glass. Afterwards, it can be easily cleaned in the dishwasher.

miele.co.za | Facebook

Miele leaderboard-banner

DIY Farm-tastic Fridge Magnets

This weekend’s project is something slightly quirky. These fun, and bling, animal magnets are a great way to spend a weekend and make great gifts for friends. They’re easy to put together and add a bit of interest to your fridge or kitchen.

What you will need
1 packet plastic/rubber farm animals, preferably hollow
1 can of foam sealant (we used Den Braven PU-FOAM 500®)
spray paint in your chosen colours – we used white and gold
strong magnets
strong glue (we used UniBond No More Nails®)

Tools
plastic or rubber gloves
newspaper
craft knife
acetone
cardboard box for spray painting

Set up a work surface and cover with newspaper.

Cut the farm animals in half with a craft knife.

Read the instructions on how to use the foam filler product you’ve purchased and ensure you use your gloves for this part of the process.

Screw the adaptor nozzle firmly on the can of foam; hold upside down and spray inside the cut animal half. The foam expands once sprayed, so only fill up the animals 50%. Leave for 24 hours to dry. If you find yourself with some foam on your hands, use a bit of acetone or nail polish remover to take it off.

Next Day
Once the foam has dried, cut off the excess with the craft knife so that it’s flush with the animal body.

Seal the foam side with a smooth layer of strong glue – this is to prevent the spray paint from damaging the foam filling.

The next step is to spray the animals with your selected spray paint colour. If you’re in a small space, use a cardboard box and spray the animals inside to contain the paint. They might need two to three layers before they look properly covered. Leave the spray paint to dry between layers and continue to spray until you are happy with the colour and coating.

Apply a drop of strong glue to the back of a magnet and stick the magnets to the surface. Make sure the surface is clean and dry before doing this.

Voila! You’ve got yourself some awesome, if slightly bizarre looking, fridge magnets to gift to buddies, or adorn your own fridge with.
DIY Animal Magnets

Exciting things afoot at Corona Farm

Reliance Compost
Eddie Redelinghuys, the Founder of Reliance Compost is a passionate man. He believes in creating a sustainable environment where all living organisms and beings, both above and below the ground, can flourish and feed populations of the future. And taking care of our soils is the source of his passion. He is a firm believer that living soils, alive with microbial activity and rich in organic matter, can feed plants, that in turn feed people and animals. The chain effect of this is so important in food security, as well as the survival of our ecosystems as we know them.

Part of Eddie’s commitment to this ideal has been a historic, multi-faceted program that is currently underway at Corona Farm in the Paarl region. The development –  a joint venture between Reliance Compost and the Corona Family Trust – addresses major concerns affecting the surrounding farmland. One such initiative is rehabilitating hectares of soil that has been depleted after decades of mining sand and gravel. The ultimate objectives are to build an organic waste recycling facility and an agricultural division – expected to create more than 1000 jobs once all phases have been implemented. The priority however is to rehabilitate and restore the soil first and foremost.

On selected areas of the farm the soils have been augmented with organic compost and several other areas on the farm are in different stages of the soil augmentation process. The improvement is an ongoing process. The first phase of the Corona project allowed for 14 hectares of table grapes to be planted and more than 50 new jobs were created, something Eddie is incredibly proud of. Another 80 hectares will be planted with citrus, vines and olives and much more is planned for the future.

One of the most exciting projects of the farm was recently unveiled – a large scale plant and tree nursery. If you have a garden, or are busy planning a new one, then you can pop in to purchase your Reliance Compost, as well as choose from a variety of plants and mature trees.

Reliance-Nursery

Rootstock planters create strong root systems.

The nursery is making use of exciting root technology called Rootmakers, which create a fibrous, non-circulating root system to ensure transplanting success. Rows of immaculately healthy looking trees and plants are ready and waiting to find new homes in gardens around the Cape. Friendly Reliance nursery staff can assist with selecting plants that are right for your needs and growing area. Future plans for the farm also include the building of a winery, brewery and distillery – so exciting things are afoot!

For the past 15 years, Reliance Compost has been changing the views and methodologies in working with organic waste, and, through its service to the City of Cape Town the company has saved over 13 million cubic meters of landfill space through the composting of garden refuse.

The construction of the facility at Corona Farm will enable the processing of even more organic waste from the city, as well as private sources, to generate energy and compost. The energy will be used to power vehicles and equipment as a replacement for fossil fuel and current electricity supplies. At least 50 jobs will be created in skilled and unskilled labour in this sector as well.
Another notable outcome of the Corona Farm project is the redistribution of agricultural land to new young farmers, who otherwise would not have been able to live their dreams. Each individual will be mentored for up to five years until they show success at farming their unit, thereafter the title deeds are handed over.

We may not all be able to make the kind of impact and difference that a company like Reliance has made to the environment, but we definitely can use this as inspiration in our own lives and homes. Small changes collectively make a big difference and just starting is a step in the right direction. Watch these fun videos that will give you some inspiration on how to go about making small but positive changes.

Reliance-Nursery

Delicious produce is grown in healthy, living soil. #Harvesttotable series brought to you by Reliance Compost.Reliance Compost